9
Instalation
The appliance must be installed only by a qualified
person in compliance with the instructions provided.
The manufacturer declines all responsibility for improper
installation which may harm persons and animals and
damage property.
Important: The power supply to the appliance must be
cut off before any adjustments or maintenance work is
done on it.
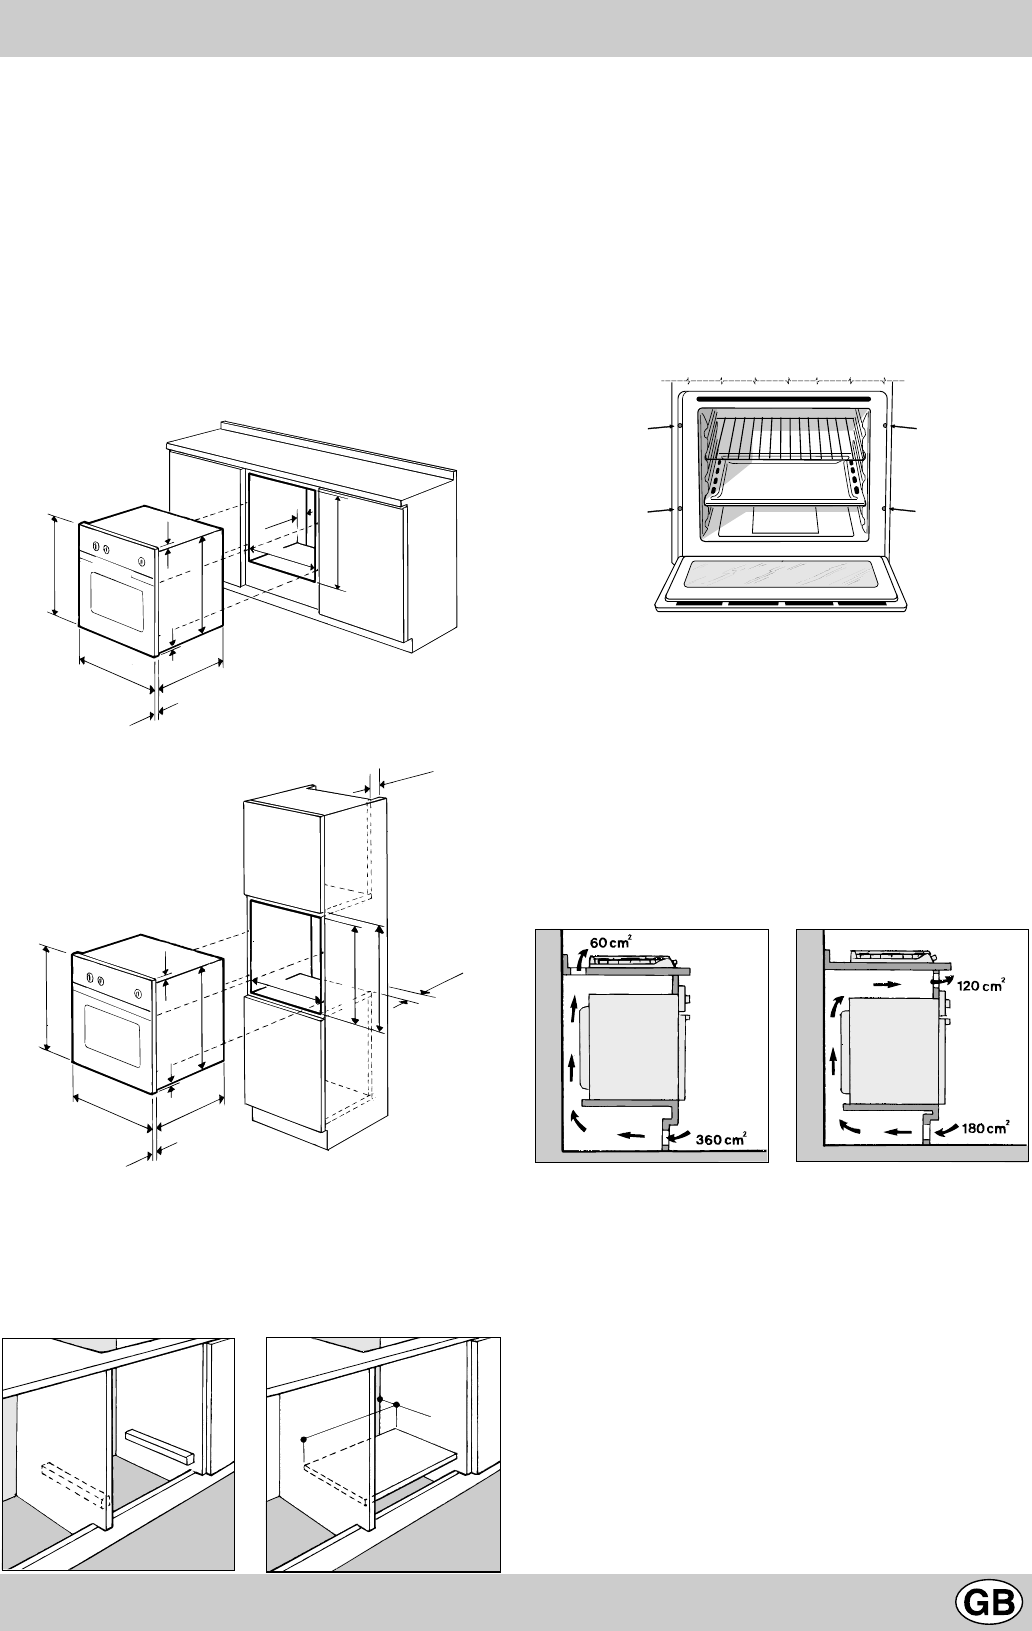
Installation of Built-in Ovens
In order to ensure that the built-in appliance functions prop-
erly, the cabinet containing it must be appropriate. The
figure below gives the dimensions of the cut-out for instal-
lation under the counter or in a wall cabinet unit.
In order to ensure adequate ventilation, the back panel of
the cabinet unit must be removed. Installing the oven so
that it rests on two strips of wood is preferable. If the oven
rests on a continuous, flat surface, there must be an ap-
erture of at least 45 x 560 mm.
The panels of the adjacent cabinets must be made of heat-
resistant material. In particular, cabinets with a veneer ex-
terior must be assembled with glues which can withstand
temperatures of up to 100 °C.
In compliance with current safety standards, contact with
the electrical parts of the oven must not be possible once
it has been installed.
All parts which ensure the safe operation of the appliance
must be removable only with the aid of a tool.
To fasten the oven to the cabinet, open the door of the
oven and attach it by inserting the 4 wooden screws into
the 4 holes located on the perimeter of the frame.
The panels of the adjacent cabinets must be made of
heat resistant material. In particular, cabinets with a veneer
exterior must be assembled with glues able to withstand
temperatures of up to 100°C.
Once the appliance has been installed, the electrical parts
must be totally protected from all contact, according to
current safety regulations.
All protecting parts should be firmly fixed and should
require the use of a tool for removal.
When installing below a built-in hob, ensure that there are
air inlets and outlets for ventilating the interior of the cabinet
adequately. Assembly examples are given in figs.
Electrical connection
Ovens with a three-pole power supply cable are designed
to operate with alternated current at the supply frequency
and voltage indicated on the data plate (at the bottom of
the oven dashboard). The earthing conductor of the cable
is the yellow-green conductor.
Two types of connection are provided:
Connection n° 1
Connecting the power supply cable to the mains.
Fit a normalized plug to the cable, which corresponds to
the load indicated on the data plate; if the cooker is
connected directly to the mains, an omnipolar circuit-
breaker with a minimum opening of 3 mm between the
contacts, suitable for the load indicated and complying
with current directives, must be installed between the
appliance and the mains (the earthing wire must not be
595 mm.
595 mm.
24 mm.
545 mm.
5 mm.
567 mm.
23 mm.
593 mm.
45 mm.
558 mm.
N.B.: Installation in compliance with the consumption declaration
595 mm.
595 mm.
24 mm.
545 mm.
5 mm.
567 mm.
23 mm.
575-585 mm.
558 mm.
595 mm.
45 mm.
min.
45 mm.
min.
560 mm.
45 mm.
 Manymanuals.com
 Manymanuals.de
 Manymanuals.fr
 Manymanuals.it
 Manymanuals.pl
 Manymanuals.cz
 Manymanuals.es
 Manymanuals-pt.com
Kommentare zu diesen Handbüchern